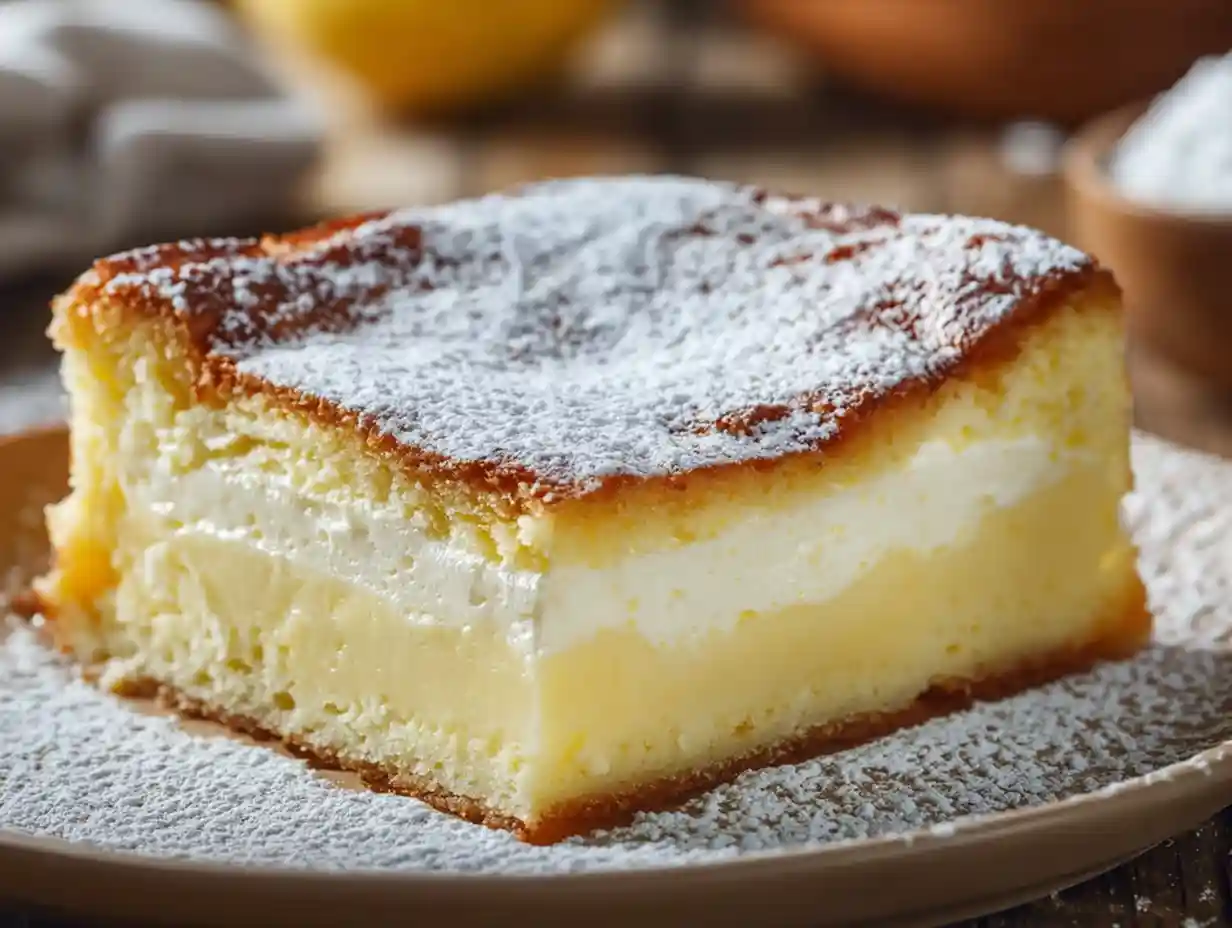

Oh, the joy of a truly magical recipe! I’ve always been captivated by desserts that surprise and delight, and this Vanilla Magic Custard Cake is one of my absolute favorites. Imagine a single, simple batter that transforms in the oven, emerging with three distinct, delicious layers. It’s a little bit of kitchen alchemy, and I can’t wait to share it with you!
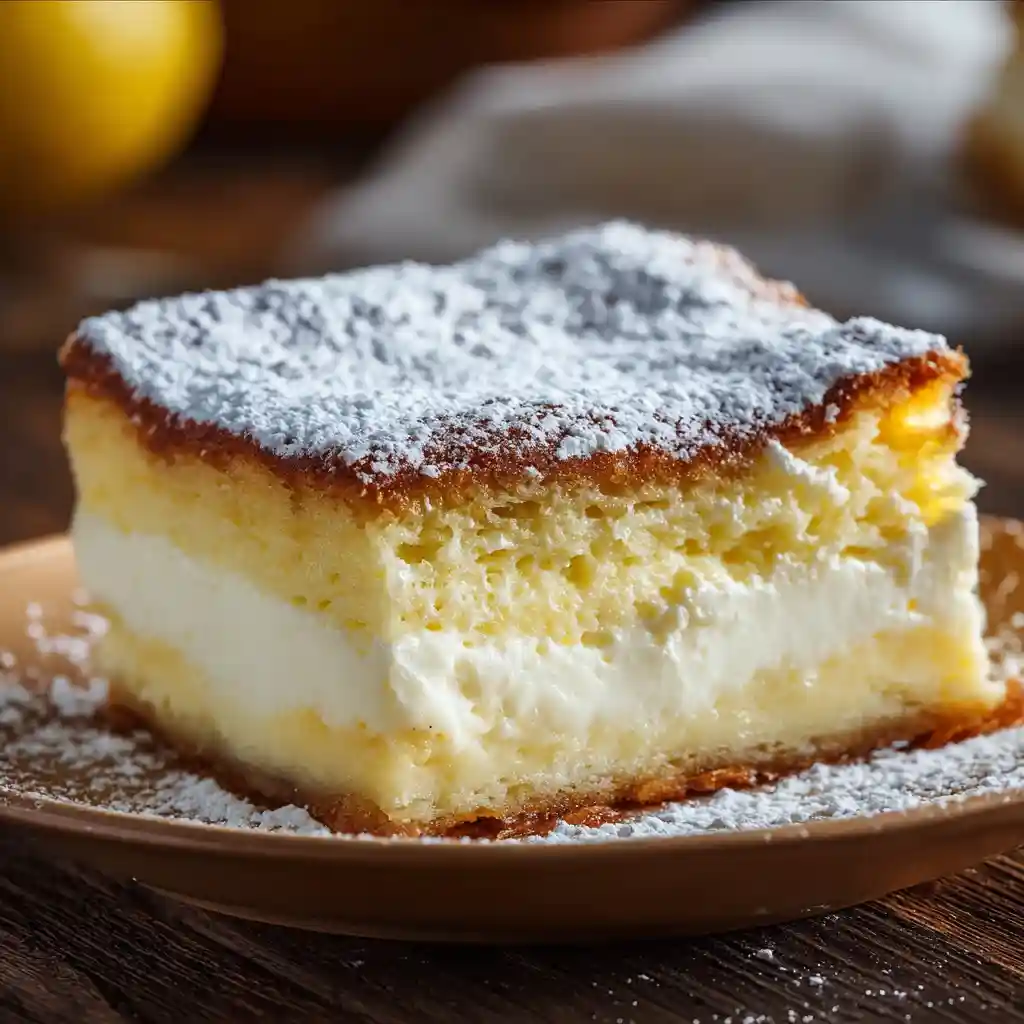
You’re in for a real treat. This cake offers a delightful journey of textures: a light, fluffy sponge on top, a creamy, melt-in-your-mouth custard in the middle, and a dense, fudgy base.
It sounds incredibly fancy, doesn’t it? But here’s the best part: despite its impressive “magic,” it’s surprisingly straightforward to make, especially with the tips I’ve gathered for you.
Table of Contents
What is Vanilla Magic Custard Cake?
This cake is a true marvel, and it’s all in the name: “magic.” It refers to how a single, thin batter magically separates during baking into three distinct layers. You start with one mixture, and through the wonders of varying ingredient densities and a gentle bake, you end up with a fluffy, airy sponge on top, a luscious, creamy custard in the center, and a denser, almost pudding-like base. It’s the subtle science of eggs, sugar, milk, and flour working together to create something truly special.
Why You’ll Love This Vanilla Magic Custard Cake Recipe
I truly believe this Vanilla Magic Custard Cake will become a cherished recipe in your kitchen. It’s one of those desserts that seems much more complicated than it actually is, making you look like a kitchen wizard! If you’re looking for other easy recipes, why not try these Amazing Apple Cinnamon Muffins, they’re another simple treat.
- The “Wow” Factor is Real: This cake is an absolute showstopper. When I serve it, people are always amazed that one batter can create such distinct layers, making it perfect for impressing guests with minimal stress.
- A Symphony of Textures: Every bite is an adventure! You get the airy lightness of a sponge, the smooth richness of custard, and the comforting chewiness of a denser cake, all infused with classic vanilla.
- Comfort in Every Slice: There’s something so comforting and nostalgic about a vanilla cake, and this recipe elevates it to a new level. It’s perfectly sweet without being cloying, and the vanilla flavor truly shines.
- Simple Steps, Magical Results: I’ve refined this recipe to be as foolproof as possible, ensuring that the “magic” happens consistently. With my step-by-step guidance, you’ll achieve those perfect layers every time.
Gather Your Ingredients
The magic begins with a handful of simple ingredients. Make sure you have these ready to go before you start!
- 1/2 cup unsalted butter, melted and slightly cooled
- 2 cups milk, lukewarm
- 1 and 1/4 cups (150 g) powdered sugar
- 4 eggs, separated
- 1 Tablespoon water
- 1 cup (115g) flour
- 2 teaspoon vanilla extract
- powdered sugar for dusting
Essential Equipment
Having the right tools always makes baking easier and more enjoyable. Here’s what you’ll need for this Vanilla Magic Custard Cake:
- 8×8 inch baking dish
- Mixing bowls (at least two, one for egg whites, one for the batter)
- Electric mixer (handheld or stand mixer is ideal for whipping eggs)
- Whisk
- Rubber spatula
- Measuring cups and spoons
- Fine-mesh sieve (for dusting powdered sugar at the end)
How to Make the Perfect Vanilla Magic Custard Cake: Step-by-Step Instructions
Ready to make some magic? Follow these steps carefully, and you’ll have a gorgeous, layered cake. I’ve included a few visual cues to help you along the way!
- Preheat the oven to 325°F. This lower temperature is key for the layers to form properly.
- Lightly grease an 8×8 inch baking dish, then set it aside. This prevents sticking and ensures a clean release.
- Whip the egg whites in a clean bowl until stiff peaks form. When you lift the whisk, the peaks should hold their shape firmly. Set these aside carefully.
- In a separate large bowl, beat the egg yolks and powdered sugar together until the mixture is pale yellow and creamy. It should be thick and airy.
- Mix in the melted butter and the tablespoon of water for about 2 minutes until everything is evenly combined. The batter will be smooth and slightly glossy.
- Mix in the flour until it is just evenly incorporated. Be careful not to overmix at this stage; just combine until no dry streaks remain.
- Slowly beat in the lukewarm milk and vanilla extract until well combined. The batter will become quite thin and liquidy, which is exactly what we want for the magic to happen.
- Delicately fold in the whipped egg whites, adding about 1/3 at a time. Use a rubber spatula to gently incorporate them, preserving as much air as possible, then repeat until all of the egg whites are folded in. Small lumps of egg white are perfectly normal and actually help with the top layer!
- Pour the batter into the prepared 8×8 inch pan and bake for 40-60 minutes. You’ll know it’s done when the cake is barely jiggly in the center and the top is golden. Baking time might vary depending on your oven or the pan you use, so start checking after 40 minutes. If the top begins to brown too quickly before the minimum 40 minutes, you can loosely cover the cake with aluminum foil.
- Cool the cake completely on a wire rack before dusting with powdered sugar. Even when fully cooled, it will still be slightly jiggly because of that wonderful, soft custard layer in the center.
Essential Tips for a Flawless Vanilla Magic Custard Cake
Getting those perfect layers is all about a few key techniques. I’ve learned a lot through trial and error, and these tips will help you nail it every time!
- The Right Pan Size Matters: An 8×8 inch baking dish is truly ideal for this recipe. It provides the perfect depth for the batter to separate into three distinct, beautifully proportioned layers. Using a larger pan might result in thinner layers and a shorter baking time, while a smaller one could make the cake too thick and require a longer, more delicate bake.
- Whip Those Yolks Just Right: When you’re beating the egg yolks and powdered sugar, aim for a pale yellow color and a noticeably thick, airy consistency. This aeration in the yolks is crucial for the structure of your creamy custard layer, giving it that delightful richness.
- The Delicate Art of Folding Egg Whites: This is perhaps the most important step for the sponge layer! “Folding” is not the same as “stirring.” Use a rubber spatula to gently scoop from the bottom and fold over, turning the bowl as you go. You want to incorporate the whites while maintaining as much air as possible; this air creates the light, fluffy top layer. Don’t worry if you see a few small lumps of egg white; that’s perfectly normal and desirable!
- Low and Slow Baking: Resist the urge to crank up the heat! The specific low oven temperature (325°F) is critical. It allows the batter to bake slowly and gently, giving the different densities of the ingredients enough time to separate and set into their distinct layers without overcooking.
- Doneness Cues: Your cake is ready when the top is beautifully golden brown, and the center still has a slight jiggle, much like a baked custard or panna cotta. If it feels completely firm, it’s likely overbaked, and your custard layer might become rubbery. Overbaking is the enemy of that creamy middle layer.
- The Importance of Cooling: I know it’s hard to wait, but allowing the cake to cool completely, and even chill in the refrigerator, is non-negotiable. This chilling time is essential for the custard layer to fully set and firm up, ensuring those beautifully defined layers when you slice into it.
Troubleshooting Your Vanilla Magic Custard Cake
Don’t fret if your first attempt isn’t absolutely perfect. We’ve all been there! Here are some common issues and how I recommend solving them:
- “Why are my layers not separating?” This is usually due to one of a few things: overmixing the batter after adding the egg whites (which deflates them), your oven temperature being too high or too low, or using a pan size that’s too large, which can make the batter too thin to separate properly. Remember, gentle folding and a precise oven temperature are key!
- “Why is my custard rubbery or eggy?” Overbaking is the most common culprit here. That creamy custard layer needs to be just barely set with a slight jiggle. If you bake it too long, the eggs will firm up too much, leading to a rubbery texture. Incorrect flour measurement can also play a role, making it too dense.
- “Why is my cake bland?” A good quality vanilla extract makes a world of difference! I always recommend using pure vanilla extract. Also, a tiny pinch of salt (not included in this recipe, but I sometimes add it to baking for flavor) can enhance sweetness, or you can simply increase the vanilla extract by another 1/2 teaspoon. Beware that some commercially available vanilla extracts may contain sugar, dextrose, corn syrup (high fructose), propylene glycol, or glycerin.
- “Why did the top layer sink or crack?” This often happens if the egg whites were overmixed initially, or not folded in gently enough, causing them to lose too much air. Rapid temperature changes (like opening the oven door too often) or an oven that runs too hot can also contribute to sinking or cracking as the cake cools.
Ingredient Substitutions & Adjustments
I love finding ways to make recipes work for different dietary needs or pantry staples. Here are some adjustments you can make:
| Ingredient | Substitution Option(s) | Notes / Adjustments |
|---|---|---|
| Milk | Almond milk, oat milk, soy milk (dairy-free) | Ensure it’s unsweetened. May subtly alter flavor and custard texture slightly, but generally works. Warm as directed. |
| Flour | Gluten-free all-purpose flour blend (with xanthan gum) | Ensure the blend contains xanthan gum or add 1/2 tsp per cup. The texture might be slightly different, but it should still form layers. |
| Unsalted Butter | Salted butter | If using salted butter, you might want to consider if any other salt is needed in the recipe. |
| Powdered Sugar | Granulated sugar | Powdered sugar helps achieve a smoother texture and dissolves more easily. Granulated sugar might make the batter slightly coarser, affecting the final texture slightly. |
| Vanilla Extract | Vanilla bean paste, fresh vanilla bean (scraped) | Use an equivalent amount for an even richer vanilla flavor. Adjust to taste. |
Baking Adaptations for Your Vanilla Magic Custard Cake
Baking conditions can vary, so here are a few ways I adapt this recipe for different scenarios:
- High-Altitude Baking: At higher altitudes, liquids evaporate faster and leavening agents work more efficiently. You might need to slightly increase the liquid (milk) by a tablespoon or two, slightly decrease the powdered sugar, and increase the oven temperature by about 15-25°F to help set the structure.
- Different Pan Sizes: If you use a 9×13 inch pan, your layers will be thinner, and the baking time will likely be shorter, perhaps by 10-15 minutes. For round pans, the layers might be thicker, potentially requiring a slightly longer baking time. Always keep a close eye on it and look for that characteristic “barely jiggly” center.
- Convection Oven Tips: Convection ovens bake faster and often more evenly. I usually suggest reducing the oven temperature by 25°F (so 300°F instead of 325°F) and starting to check for doneness earlier than the recipe suggests.
Serving, Flavor Variations & Topping Ideas
This cake is already fantastic on its own, but here are some ways I love to serve and customize it!
- Best Serving Temperature: I find this cake absolutely shines when served chilled, straight from the fridge, or at cool room temperature. This allows the custard layer to be perfectly set and creamy, offering the best textural experience.
- Beyond Vanilla: While vanilla is a classic for a reason, you can easily experiment with other extracts! Try adding almond extract, a bit of lemon zest, a dash of coffee extract, or even a tablespoon of rum for a more sophisticated flavor profile.
- Topping Suggestions: A simple dusting of extra powdered sugar is always elegant. But if you want to dress it up, I love serving it with fresh berries (raspberries or strawberries are beautiful), a dollop of homemade whipped cream, a drizzle of warm caramel or chocolate sauce, or even a sprinkle of grated nutmeg. For an autumnal twist, consider these Amazing Soft Pumpkin Cookies With Cinnamon Frosting.
Make-Ahead & Freezing Instructions
Planning ahead can make hosting so much smoother. Here’s how I handle making this cake in advance:
- Make-Ahead: This Vanilla Magic Custard Cake is actually better after it’s had time to chill and for the flavors to meld, so it’s perfect for making ahead. I recommend preparing it ideally 1-2 days before you plan to serve it for the best texture and flavor.
- Freezing: Yes, you can freeze this cake! Once it’s completely cooled, I wrap it tightly in plastic wrap, then an additional layer of aluminum foil. It can be frozen for up to 1 month. To thaw, simply transfer it to the refrigerator overnight.
Storage Instructions
Due to its creamy custard layer, proper storage is essential to keep your Vanilla Magic Custard Cake tasting fresh and delicious.
- Refrigeration: Always store any leftover cake in an airtight container in the refrigerator. It will keep beautifully for up to 3-4 days. If you are looking for more great ideas, see our Desserts and Drinks category.
FAQs about Vanilla Magic Custard Cake
I get so many wonderful questions about this cake! Here are answers to some of the most common ones:
- Can I use cold milk? I strongly recommend using lukewarm milk. It helps the butter and other ingredients emulsify more smoothly into the batter, ensuring a consistent mixture that’s crucial for proper layer separation.
- Do I need to warm the eggs? While separating the eggs is key, you don’t necessarily need to warm the egg whites. However, having the egg yolks at room temperature before beating with sugar will help them whip up to a pale yellow, airy consistency more effectively.
- Why do I need to separate the eggs? Separating the eggs is fundamental to the magic! The whipped egg whites create the airy, sponge-like top layer, while the egg yolks contribute richness and structure to the creamy custard middle and dense base.
- How do I know when the cake is done? Your cake is done when the top is golden brown and the center is still barely jiggly, similar to a perfectly set flan or cheesecake. If you insert a wooden skewer, it shouldn’t come out with wet batter, but might have a few moist crumbs from the custard.
- Can I open the oven door while it’s baking? I generally advise against opening the oven door too often, especially during the first 30 minutes of baking. Sudden temperature drops can cause the cake to sink, affect the delicate layer separation, or lead to cracking.
- Why did my cake not get three layers? This is often due to overmixing the batter (especially after adding egg whites), an incorrect oven temperature, or using a pan that’s too large for the amount of batter. Review my troubleshooting tips above for more details!
- Can I make this dairy-free or gluten-free? Yes, absolutely! Check out my “Ingredient Substitutions & Adjustments” table above for specific recommendations on how to adapt this recipe for dairy-free milk or gluten-free flour.
- How long does Vanilla Magic Custard Cake last? Stored properly in an airtight container in the refrigerator, this cake will last for 3-4 days.
- Can I make this in a different size pan? Yes, but you’ll need to adjust the baking time. A larger pan (like 9×13) will result in thinner layers and a shorter bake, while a smaller or round pan might yield thicker layers and require longer. Always keep an eye on the “jiggle” for doneness.
Nutritional Information
Nutritional information is an estimate based on third-party calculators and will vary.
Conclusion
There’s something truly special about creating a dessert that feels like a little bit of magic, and this Vanilla Magic Custard Cake delivers every time. I find such immense satisfaction in watching those distinct layers form, knowing that from one simple batter, I’ve created something so beautiful and delicious. It’s a wonderful reminder that sometimes the most impressive things in the kitchen are surprisingly easy to achieve!
I really hope you give this recipe a try and experience the magic for yourself. I’d love to hear how it turns out for you! Please leave a comment below with your thoughts, any questions you have, or if you discover your own fun flavor variations. Happy baking!
Love easy, magical desserts? Follow us on Pinterest for more delicious recipes like this Vanilla Magic Custard Cake, plus cheesecakes, cookies, and cozy bakes you’ll fall in love with!

Amazing Vanilla Magic Custard Cake Recipe
Ingredients
Equipment
Method
- Preheat the oven to 325°F. This lower temperature is key for the layers to form properly.
- Lightly grease an 8×8 inch baking dish, then set it aside. This prevents sticking and ensures a clean release.
- Whip the egg whites in a clean bowl until stiff peaks form. When you lift the whisk, the peaks should hold their shape firmly. Set these aside carefully.
- In a separate large bowl, beat the egg yolks and powdered sugar together until the mixture is pale yellow and creamy. It should be thick and airy.
- Mix in the melted butter and the tablespoon of water for about 2 minutes until everything is evenly combined. The batter will be smooth and slightly glossy.
- Mix in the flour until it is just evenly incorporated. Be careful not to overmix at this stage; just combine until no dry streaks remain.
- Slowly beat in the lukewarm milk and vanilla extract until well combined. The batter will become quite thin and liquidy, which is exactly what we want for the magic to happen.
- Delicately fold in the whipped egg whites, adding about 1/3 at a time. Use a rubber spatula to gently incorporate them, preserving as much air as possible, then repeat until all of the egg whites are folded in. Small lumps of egg white are perfectly normal and actually help with the top layer!
- Pour the batter into the prepared 8×8 inch pan and bake for 40-60 minutes. You’ll know it’s done when the cake is barely jiggly in the center and the top is golden. Baking time might vary depending on your oven or the pan you use, so start checking after 40 minutes. If the top begins to brown too quickly before the minimum 40 minutes, you can loosely cover the cake with aluminum foil.
- Cool the cake completely on a wire rack before dusting with powdered sugar. Even when fully cooled, it will still be slightly jiggly because of that wonderful, soft custard layer in the center.