
Hi, I’m Evelyn Rose Smith, and I’m so glad you’re here at Gather and Cook! I truly believe that some of the best kitchen magic happens when you bring a little festivity to everyday treats.
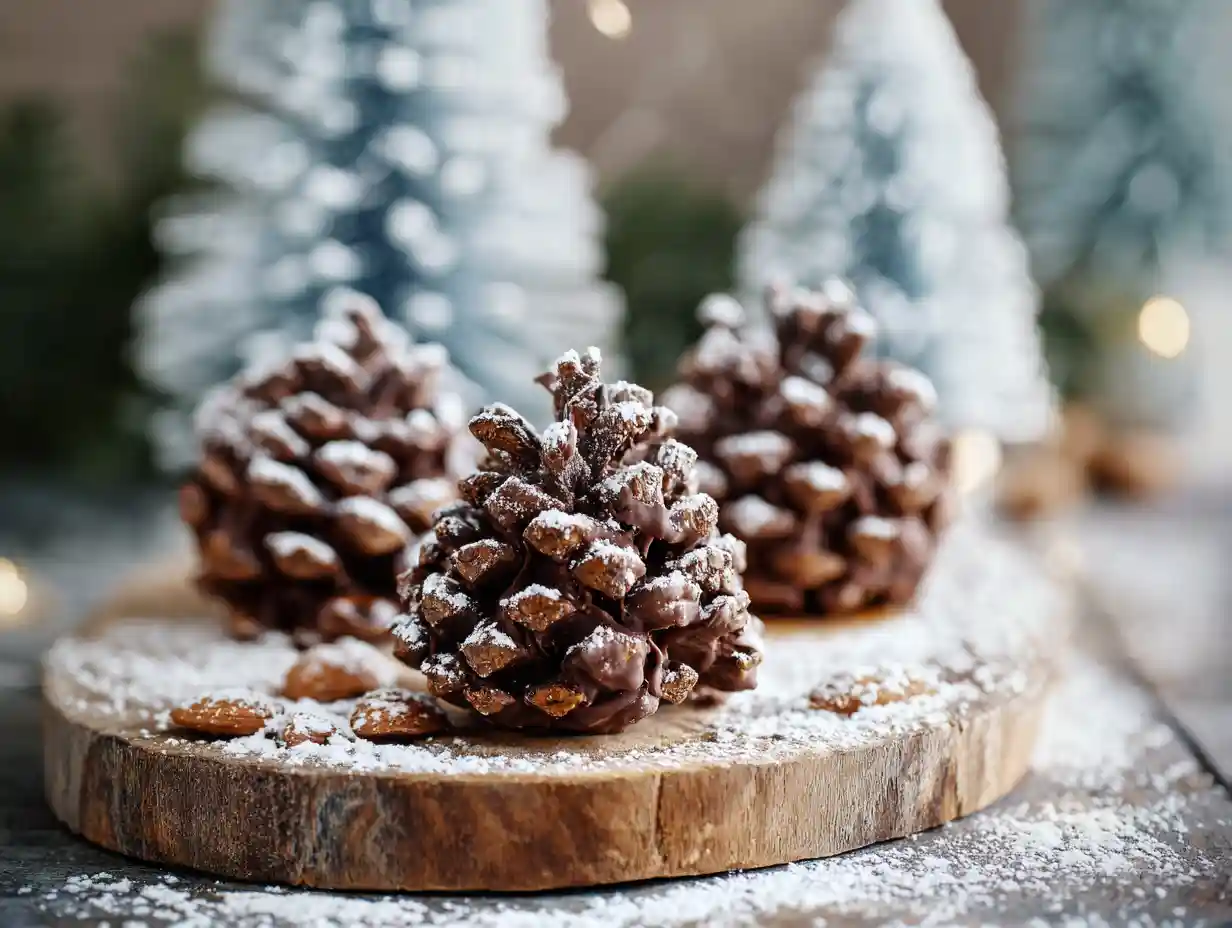
Today, I’m absolutely delighted to share a Pincone Truffles recipe that feels like a cozy walk through a winter forest, right in your own kitchen. These delightful little edible pinecones are not only charmingly beautiful but also wonderfully easy to make.
What I love most about this recipe is its simplicity and the sheer joy it brings. They are a fantastic no-bake option for holidays, forest-themed parties, or just a fun afternoon project. This particular Pincone Truffles Recipe is truly a joy to create and even more of a joy to share with loved ones.
Table of Contents
Why You’ll Adore This No-Bake Pincone Truffles Recipe

I think you’re going to fall head over heels for these pinecone truffles, and I have a few good reasons why! First, they are incredibly easy to make, and the “no-bake” aspect means less oven time and more fun. I appreciate that, especially during busy seasons.
Second, their festive appearance makes them a showstopper on any dessert table. Everyone always oohs and aahs over how realistic they look. Finally, they are wonderfully customizable, which means I can tailor them to different tastes or make them perfect for gift-giving. They truly make a wonderful, thoughtful present or a stunning addition to any party dessert spread.
Essential Equipment for Your Pincone Truffles
To make these lovely pinecone truffles, you’ll need a few essential kitchen tools. I always find it helpful to gather everything before I begin.
- Lipped Baking Sheets: I use these for roasting the almonds safely, making sure they don’t roll off.
- Blender or Food Processor: This tool is crucial for grinding the whole almonds into a fine, almost pasty consistency for the truffle base.
- Double Boiler: I use a double boiler to gently melt the chocolate and cream, which prevents the chocolate from seizing or burning. If you don’t have one, I often improvise with a heat-proof bowl set over a simmering pot of water.
- Mixing Bowls: You’ll need a couple of these for combining ingredients and holding your cocoa powder.
- Spoon or Small Scoop: I use this for portioning out the truffle mixture, ensuring each pinecone is a similar size.
- Parchment Paper or Wax Paper: I line my baking sheets or platters with this to prevent the truffles from sticking while they chill.
Ingredients for Irresistible Pincone Truffles
Here are the simple ingredients I use to create these delightful treats. Each one plays an important role in the final flavor and texture.
- 1/2 cup whole raw almonds: I roast these and grind them to create a unique nutty base for the truffle, adding depth and structure.
- 1 1/2 cups sliced raw almonds: These are the key to our pinecone “scales”! I roast them lightly to enhance their flavor and make them crisp.
- 10 ounces dark chocolate chips (about 60% cacao): I find dark chocolate provides the richest, most luxurious flavor for the truffle. I recommend a good quality chocolate here, as it’s the star of the show. Dark chocolate contains 50-90% cocoa solids, cocoa butter, and sugar, and is often considered a functional food due to its potential anti-inflammatory properties [1].
- 1/2 cup heavy cream: This creates a smooth, decadent ganache when combined with the chocolate. There isn’t a direct substitution I recommend for the cream in this recipe, as it’s vital for the truffle’s texture.
- 1 tablespoon honey: I add honey for a touch of natural sweetness and to help achieve that perfect, pliable truffle consistency. Maple syrup could be a decent alternative if you prefer.
- 1/2 teaspoon pure vanilla extract: Vanilla brightens all the other flavors, giving the truffles a warm, inviting aroma.
- 1/4 teaspoon salt: Just a pinch of salt enhances the chocolate flavor and balances the sweetness beautifully. Don’t skip it!
- 1/3 cup Dutch process cocoa powder: I use this for rolling the truffles. Dutch process cocoa gives a beautiful, dark color and a less bitter, smoother chocolate flavor than natural cocoa.
Step-by-Step Instructions: Crafting Your Pincone Truffles
Making these pinecone truffles is a fun and rewarding process. I’ll walk you through each step!
- Preheat the oven to 350 degrees Fahrenheit. I always make sure my oven is fully preheated for even roasting. Evenly spread out the whole raw almonds on one lipped baking sheet, and the sliced raw almonds on another. Roast until very lightly deepened in color and fragrant, about 6-8 minutes for the sliced almonds and 10-12 minutes for the whole almonds. Keep a close eye on them, as they can burn quickly.
- Grind the roasted WHOLE almonds in a blender or food processor until they reach a stage halfway between almond flour and almond butter. I want it to be a coarse meal, not a completely smooth butter. Set them aside.
- In the top of a double boiler, melt together the chocolate and cream until smooth, stirring constantly. I make sure the water in the bottom pot isn’t boiling too vigorously, just a gentle simmer. Then remove from heat and stir in the ground roasted almond mixture, honey, vanilla, and salt until combined. Cover and place in the refrigerator for 90 minutes. This chilling time is important for the truffle mixture to firm up properly.
- Once chilled, I use a spoon to scoop out a roughly 2×1-inch cylinder of the truffle mixture. Form it into an egg shape that’s slightly skinnier than an actual egg, mimicking the natural taper of a pinecone. I find gently pressing and rolling in my palms works best. Lightly roll it in the cocoa powder to make the exterior less sticky. This step is key for easier handling.
- Now for the fun part! Insert the roasted sliced almonds into the truffle at a low angle to mimic the scales of a pinecone. I start from the wide end and work my way up, overlapping them slightly. Each almond should be angled just a bit, pointing away from the base, to create that realistic texture. Repeat until you’ve used all the truffles and sliced almonds. This recipe makes about 18 pinecone truffles.
Choosing the Best “Scales” for Your Pincone Truffles
While my Pincone Truffles recipe uses delicious roasted sliced almonds for the scales, I know some of you might be wondering about other creative options for pinecone truffles in general. If you ever want to experiment or make a different kind of pinecone treat, here are some ideas for “scales” you could consider:
- Sliced Almonds: These are what I use in my recipe. They offer a beautiful, natural look, a delicate crunch, and a wonderful nutty flavor that complements the chocolate perfectly.
- Frosted Flakes Cereal: If you’re looking for a slightly larger, lighter scale with a sweet crunch, lightly crushed frosted flakes can work well. They’ll give a more rustic, snow-dusted appearance.
- Chocolate Cereals (like Chocos/Cocoa Puffs): For a completely chocolatey experience, I’ve seen small chocolate cereals used. You’d need to break them into smaller pieces. They offer a strong chocolate flavor and a crunchy texture.
- Chex Cereal (Rice or Corn): Chex pieces can also be carefully broken into scale-like shapes. They are quite neutral in flavor, making them a good option if you want the truffle base to be the star.
- Shredded Wheat Cereal Pieces: The individual strands of shredded wheat, broken into small pieces, can create a very textural, almost feathery pinecone look. They have a mild, wholesome flavor.
Remember, each “scale” choice will impact the overall aesthetic and flavor profile, so have fun exploring if you decide to venture beyond my almond scales!
For more exciting treats, you might enjoy this recipe for Strawberry Shortcake Sushi Rolls, a unique recipe that’s sure to impress.
Creative Variations & Toppings for Pincone Truffles
I love how versatile this Pincone Truffles Recipe is! You can easily put your own spin on it. Here are some of my favorite ways to get creative:
- Citrus Zest: For a brighter flavor, I sometimes add 1/2 teaspoon of finely grated orange or tangerine zest to the melted chocolate mixture. It pairs beautifully with the dark chocolate and almonds.
- Peppermint Twist: During the holidays, a tiny drop of pure peppermint extract (start with 1/8 teaspoon and add more if desired) can transform these into a festive mint-chocolate delight.
- Spiced Elegance: A pinch of cinnamon or a dash of cardamom in the truffle base can add a warm, comforting note.
- White Chocolate Drizzle: Once the pinecones are assembled, I like to drizzle a little melted white chocolate over them to mimic a dusting of snow. It adds a lovely visual contrast.
- Edible Glitter: For extra sparkle, a light dusting of edible gold or silver glitter after the truffles are set makes them truly magical, especially for special occasions.
- Sprinkles: While not traditional, a few festive sprinkles can be added, particularly if you’re making these with children.
While some pinecone truffle recipes use cake pop or Oreo bases, I really enjoy the rich almond and chocolate flavor of this specific recipe. These variations allow you to customize it without changing the delicious core.
Craving more delicious ideas? Check out our entire collection of Desserts & Drinks for inspiration.
Dietary Adaptations for Your Pincone Truffles
I know many of you have different dietary needs, and I want everyone to be able to enjoy these delicious pinecone truffles. Here are some ways I’ve found to adapt this recipe:
| Dietary Need | Ingredient to Substitute | Suggested Substitution/Method |
|---|---|---|
| Vegan | Dark chocolate chips, Heavy cream, Honey | Use vegan dark chocolate chips (ensure they are dairy-free). Substitute full-fat canned coconut milk (the thick cream from the top, chilled) for heavy cream; whisk it well before using. Replace honey with maple syrup or agave nectar. |
| Gluten-Free | This recipe is naturally gluten-free! | Ensure your chocolate chips, vanilla extract, and cocoa powder are certified gluten-free if cross-contamination is a concern. |
| Lower Sugar | Dark chocolate chips, Honey | Opt for dark chocolate chips with a higher cacao percentage (70% or above) which inherently contain less sugar. Reduce the amount of honey, or replace it with a sugar-free liquid sweetener to taste. Be aware that reducing sugar can slightly alter the texture, so I recommend reducing honey by half first and testing. |
| Nut-Free | Whole raw almonds, Sliced raw almonds | This recipe relies heavily on almonds for its base and “scales.” To make a truly nut-free pinecone truffle, I would suggest finding a different base recipe (e.g., an Oreo cookie crumb base) and using gluten-free cornflakes or pretzel sticks for the scales. As written, this specific recipe cannot be easily made nut-free without significant changes to its core. |
Tips for Success with Pincone Truffles
I want you to have the most delicious and beautiful pinecone truffles possible, so I’m sharing my top tips for success:
- Don’t Over-Roast the Almonds: Keep a close eye on your almonds in the oven. They can go from perfectly golden to burnt in a flash! I aim for just a fragrant aroma and a very slight color change.
- Chill Thoroughly: The 90-minute refrigeration time for the truffle mixture is crucial. If it’s too soft, your pinecones will be difficult to shape and the scales won’t stick well. If it feels too soft after 90 minutes, I pop it back in for a bit longer.
- Work with Slightly Damp Hands: When shaping the truffles, I find that lightly dampening my hands with water prevents the mixture from sticking too much. I re-dampen as needed.
- Shape the Base First: Focus on getting that tapered egg shape for your truffle base before adding any scales. This creates a good foundation for a realistic pinecone.
- Angle the Scales: The key to a realistic pinecone look is inserting the sliced almonds at a low, slightly upward angle, overlapping them. I start from the wide base and work my way up, creating neat rows.
- Cocoa Powder is Your Friend: Rolling the truffle base in cocoa powder before adding scales makes it much easier to handle and gives it a lovely, earthy finish.
Troubleshooting Common Pincone Truffle Issues
Even the best cooks run into little snags sometimes. If you encounter any of these common issues, I have some solutions for you:
- Truffle Mixture Too Sticky: If your mixture is too sticky to handle, it likely hasn’t chilled enough. I would place it back in the refrigerator for another 30-60 minutes. Sometimes, using slightly damp hands also helps.
- Truffle Mixture Too Crumbly: This can happen if the mixture is too cold or if there wasn’t enough liquid. I would try kneading it gently with your hands for a minute to warm it slightly, or adding a tiny bit more melted honey or heavy cream, just a teaspoon at a time, until it comes together.
- Chocolate Seizes: If your chocolate mixture suddenly becomes grainy and stiff when melting, it might have come into contact with water or overheated. Unfortunately, seized chocolate is hard to recover. I usually prevent this by using a proper double boiler and ensuring no steam or water gets into the chocolate.
- Scales Not Adhering Well: If your sliced almonds are slipping off, your truffle mixture might be too warm or too wet. I would try re-chilling the truffle base for another 20-30 minutes. Gently press the almonds firmly into the truffle.
How to Store Your Pincone Truffles
Once you’ve made these beautiful pinecone truffles, you’ll want to store them properly to keep them fresh and delicious!
- Refrigeration: I always store my finished pinecone truffles in an airtight container in the refrigerator. They will stay fresh and firm for up to 1 week. I like to place a piece of parchment paper between layers if I stack them.
- Freezer Storage: For longer storage, you can freeze these truffles! I arrange them in a single layer on a baking sheet and freeze until solid, about 1-2 hours. Then, I transfer them to a freezer-safe airtight container or bag. They will keep well for up to 1 month.
- Thawing for Serving: To serve frozen truffles, I simply transfer them from the freezer to the refrigerator a few hours before I plan to enjoy them, or let them sit at room temperature for about 15-20 minutes. This allows them to soften slightly while maintaining their shape and texture.
Making Ahead: Pincone Truffles for Stress-Free Entertaining
I love a good make-ahead recipe, especially during busy times! These pinecone truffles are perfect for preparing in advance, which really cuts down on stress when entertaining.
- Truffle Mixture: I find the truffle mixture can be prepared up to 3 days in advance. I simply make it, cover it tightly, and store it in the refrigerator. When I’m ready to assemble, I might let it sit out for 10-15 minutes to slightly soften before shaping.
- Assembled Pinecones: The fully assembled pinecone truffles can be made 2-3 days ahead of time and stored in an airtight container in the refrigerator. If I’m freezing them for longer, I follow my freezer storage guidelines above.
Preparing them ahead means I can focus on other aspects of my gathering, knowing that a beautiful and delicious dessert is already taken care of.
For a savory contrast, you might also enjoy making Amazing Cranberry Salsa Over Cream Cheese Recipe.
Presenting & Serving Your Pincone Truffles
These pinecone truffles are so visually appealing, I always enjoy finding creative ways to present them. They truly elevate any dessert spread!
- Festive Platter: I love arranging them on a large, rustic platter, perhaps with a few sprigs of rosemary or evergreen for a natural, forest-like touch. A dusting of powdered sugar can also mimic fresh snow.
- Tiered Stand: For a more elegant display, I use a tiered dessert stand to showcase their unique shape at varying heights.
- With Beverages: I find these truffles pair beautifully with a strong cup of coffee, a warm mug of hot chocolate, or even a glass of mulled wine during the colder months. The rich chocolate and nutty almond flavors complement these drinks wonderfully.
- Edible “Forest Floor”: Sometimes I create an edible “forest floor” by sprinkling some crushed graham crackers or crumbled cookies on a platter before arranging the pinecones on top. It’s a fun, whimsical touch!
Gift-Giving Ideas: Sharing Homemade Pincone Truffles
Homemade gifts carry so much thought and warmth, and these Pincone Truffles are no exception. I love sharing them with friends and family during the holidays.
- Small Bakery Boxes: I often use small, clear-top bakery boxes lined with parchment paper. This allows the beautiful pinecone shape to be seen immediately.
- Cellophane Bags with Ribbon: For a simpler presentation, I place a few truffles in clear cellophane bags and tie them with a festive ribbon, perhaps a plaid or velvet one for a cozy feel.
- Mason Jars (for smaller batches): If I’m giving a smaller quantity, a wide-mouth mason jar can work well, especially if I add a pretty label.
- Handwritten Tags: I always attach a handwritten tag with a sweet message and a note about proper storage. This adds such a personal touch that everyone appreciates.
Fun in the Kitchen: Making Pincone Truffles with Kids
Getting kids involved in the kitchen is one of my favorite things to do. These pinecone truffles are particularly fun for little hands, and I have a few tips to make it enjoyable for everyone!
- Age-Appropriate Tasks: For younger children, I let them help with rolling the truffle mixture into the basic egg shape. They also love rolling them in the cocoa powder.
- Inserting Scales: Older children can take on the task of inserting the sliced almonds, which can be a fun puzzle! I encourage them to be patient and show them how to angle the almonds.
- Safety First: I always supervise carefully, especially around the hot oven and double boiler. Once the mixture is chilled, it’s a safe, no-heat activity.
- Embrace the Imperfection: I remind myself and the kids that perfection isn’t the goal; it’s about making memories and having fun. Sometimes the most “imperfect” pinecones are the cutest!
- Taste Testing: Of course, the best part is the taste test! I always let them try a bit of the truffle mixture (before chilling) and the finished product.
FAQs About Pincone Truffles
I often get questions about this Pincone Truffles Recipe, so I’ve put together some answers for you!
Can I use a different type of chocolate?
Yes, you certainly can! While I love the richness of 60% cacao dark chocolate, you could use semi-sweet chocolate chips for a sweeter truffle. I don’t recommend milk chocolate, as it’s often too sweet and may not set up as firmly.
How long do pincone truffles last?
When stored in an airtight container in the refrigerator, these pinecone truffles will last for up to 1 week. You can also freeze them for up to 1 month.
Are these really no-bake (after the almonds are roasted)?
Yes, absolutely! The only heat involved is for toasting the almonds, which is a very quick and simple step. After that, there’s no baking involved, making them a fantastic easy treat.
Can I make these nut-free?
This specific recipe relies heavily on almonds for both the truffle base and the scales, so it’s not easily adaptable to be nut-free. For a nut-free pinecone truffle, I would recommend exploring recipes that use a different base, like an Oreo crumb base, and then using pretzel sticks or gluten-free cornflakes for the scales.
Estimated Nutritional Information
Due to the dynamic nature of ingredients and preparation, and without specialized nutritional analysis software, I cannot provide exact nutritional values for this Pincone Truffles Recipe. Any such information would be an estimate based on individual ingredient components and preparation methods.
Conclusion: Your Holiday Table Awaits!
I truly hope you feel inspired to try this Pincone Truffles Recipe and bring a little bit of forest magic to your kitchen. I find so much joy in creating beautiful, delicious treats to share, and these truffles are a perfect example of that. They are simple, festive, and absolutely delightful.
I would love to hear from you! Please leave a comment below with your favorite variation, any lingering questions you might have, or better yet, share photos of your beautiful pinecone creations with me! I’m always eager to see what you’re cooking up at your table.
Into cozy, elegant treats that double as gifts? Follow us on Pinterest for recipes that wow every time.

Amazing Pincone Truffles Recipe: Festive and Simple
Ingredients
Equipment
Method
- Preheat the oven to 350 degrees Fahrenheit. I always make sure my oven is fully preheated for even roasting. Evenly spread out the whole raw almonds on one lipped baking sheet, and the sliced raw almonds on another. Roast until very lightly deepened in color and fragrant, about 6-8 minutes for the sliced almonds and 10-12 minutes for the whole almonds. Keep a close eye on them, as they can burn quickly.
- Grind the roasted WHOLE almonds in a blender or food processor until they reach a stage halfway between almond flour and almond butter. I want it to be a coarse meal, not a completely smooth butter. Set them aside.
- In the top of a double boiler, melt together the chocolate and cream until smooth, stirring constantly. I make sure the water in the bottom pot isn’t boiling too vigorously, just a gentle simmer. Then remove from heat and stir in the ground roasted almond mixture, honey, vanilla, and salt until combined. Cover and place in the refrigerator for 90 minutes. This chilling time is important for the truffle mixture to firm up properly.
- Once chilled, I use a spoon to scoop out a roughly 2×1-inch cylinder of the truffle mixture. Form it into an egg shape that’s slightly skinnier than an actual egg, mimicking the natural taper of a pinecone. I find gently pressing and rolling in my palms works best. Lightly roll it in the cocoa powder to make the exterior less sticky. This step is key for easier handling.
- Now for the fun part! Insert the roasted sliced almonds into the truffle at a low angle to mimic the scales of a pinecone. I start from the wide end and work my way up, overlapping them slightly. Each almond should be angled just a bit, pointing away from the base, to create that realistic texture. Repeat until you’ve used all the truffles and sliced almonds. This recipe makes about 18 pinecone truffles.